|
Order-Link Buy Button With Customer Input Field
Order-Link can be used to collect information, which directly relates
to each product that is ordered. The customer comment is saved for
each product and is included in receipts, order notices, fulfilment
notices, and purchase orders (eMerchant).
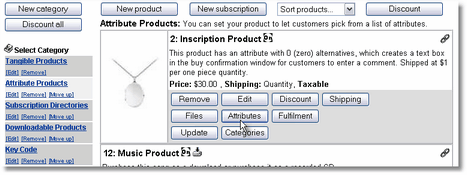
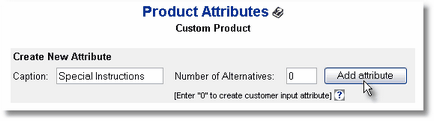
Create A Customer Input Attribute For The Product
Open the AShop administration panel, navigate to the product and
click on the Attributes button.
Enter a caption and add an attribute with 0 (zero)
alternatives.
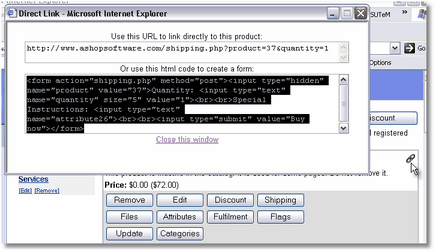
Get Order-Link Form Code
Exit from the attribute window and navigate to the
product listing. Click on the chain link icon on the top right side
of the product listing and copy the Order-Link form code.
Insert Form With Text Box Into Web
Page
Open the web page in an HTML editor. Paste the Order-Link
form code into the source code of the body of the page. In Dreamweaver
this can be done from the WYSIWYG view by clicking in page where
the form goes and then Ctrl + Shift + V (paste code) or from the
code view using Ctrl + V (paste text).

Here is an example of Order-Link form code, just as it was copied
from an Order-Link code generator.
<form action="shipping.php" method="post">
<input type="hidden" name="product" value="2">
Quantity: <input type="text" name="quantity"
size="5" value="1">
<br><br>
Front - Engraving: <input type="text" name="attribute2">
<br><br>
Back - Engraving: <input type="text" name="attribute3">
<br><br>
<input type="submit" value="Buy now">
</form>
Change the form action URL as needed
depending on where the page is to be located relative to the shopping
cart installation. If the page is on a different site, the form
action URL must be absolute. For instance http://www.yoursite.com/shipping.php
Here is the resulting form.
Insert Parameter For Add To Cart (for multiple
product orders)
The form from from the Order-Link code generator is a Buy Now button,
which is for single item orders. It clears the basket contents and
adds that one product. To keep each product that is added to the
cart and add more than one product, a hidden "add" field
must be included in the form.
<input type="hidden" name="add" value="1">
Modify Form Page Layout
Hide Quantity Field
To set the quantity to 1 and hide the quantity box, change the quantity
form field type to "hidden" and remove the size parameter.
Before: <input type="text" name="quantity"
size="5" value="1">
After: <input type="hidden" name="quantity"
value="1">
Use An Image Instead Of Generic Form Button
To use an image instead of a generic form button, change the submit
button input type from "submit" to "image" and
insert an image URL.
Before: <input type="submit" value="Buy now">
After: <input type="image" border="0" name="imageField"
src="../images/buysp-en.gif">
Align Buy Button And Input Field
Remove the break tags to align the input field and the buy button.
<form action="http://www.ashopsoftware.com/deluxe-demo/shipping.php"
method="post">
<input type="hidden" name="product" value="2">
<input type="hidden" name="quantity" value="1">
<input type="hidden" name="add" value="1">
Front - Engraving: <input type="text" name="attribute2">
Back - Engraving: <input type="text" name="attribute3">
<input type="image" name="imageField"
src="../images/buysp-en.gif">
</form>
Insert Form Objects Into Table
For more precise alignment of the text field and button image, create
a table with at least two columns and put the form objects in separate
table cells. Also, forms can sometimes prevent tight adjustment
of table row height. If this is an issue, hide the form tags between
the <table> and <tr> tags.
<table width="400" cellspacing="0" cellpadding="2">
<form action="http://www.ashopsoftware.com/deluxe-demo/shipping.php"
method="post">
<input type="hidden" name="product" value="2">
<input type="hidden" name="quantity" value="1">
<input type="hidden" name="add" value="1">
<tr><td align="right">
<p>Front - Engraving: <input type="text" name="attribute2"><br>
Rear - Engraving: <input type="text" name="attribute3"></p>
</td><td valign="bottom">
<input type="image" name="imageField"
src="../images/buysp-en.gif">
</td></tr></form></table>
Form validation may be added using Dreamweaver behavior tools or
whatever other form tools may be included with the HTML editor program
that you use.
See also: Order-Link
Basics | Order-Link
Help Topic
Basic Buy and Add To
Cart Links Using Order-Link
Add Buy buttons, View Cart
and Check Out links into an existing web page using Order-Link.
Order-Link Buy Button
With Customer Input Field
Select From Attribute
Alternatives Using Order-Link |
