To make the Cloudfront streaming features work, you will first need to set your Amazon AWS account up according to the following instructions. The security credentials and URLs created by your AWS account need to be entered into the file includes/aws/asw-config.php in your AShop. Start by downloading that file from your site or find it in the unzipped AShop files you downloaded from the AShop Software website. You can use any text editor to modify the file, for example Windows Notepad.
Now let's start by logging in to AWS. Go to the URL: http://aws.amazon.com/ and select My Account/Console at the top right menu, then click AWS Management Console. Login to your account with the email and password you used when you signed up for AWS. If you haven't signed up yet, you can do so by clicking the Sign Up button next to the menu.
The first thing you will need to do, after you have logged in to the AWS Console, is to create an Access Key, which will allow you to control your AWS account from your AShop. This can be done by selecting Security Credentials in the account menu in the upper right area of the page. If you are presented with a security warning at this stage, just click Continue to Security Credentials. Now click Access Key and then Create New Access Key. To avoid any prying eyes seeing this sensitive information, the credentials you just created are initially hidden. Show them by clicking Show Access Key. You will see the following:
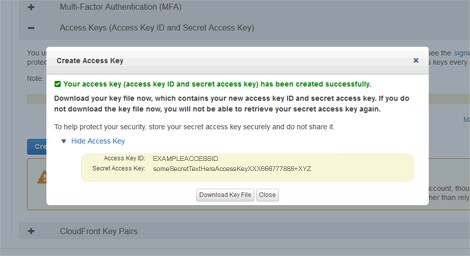
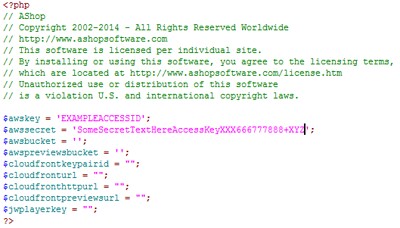
Copy the text you see next to "Access Key ID" into your aws-config.php file on the line that starts with $awskey and the text after "Secret Access Key" into the line that starts with $awssecret. Your aws-config.php file should now look like this:
Go back to your browser where the AWS Security Credentials page is open and click the Close button to close the popup window with the Access Key. Now click CloudFront Key Pairs and then Create New Key Paid. You should now see the following:
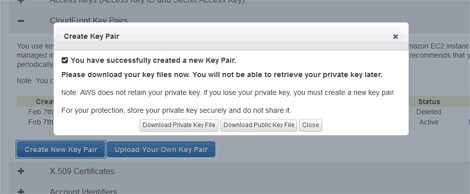
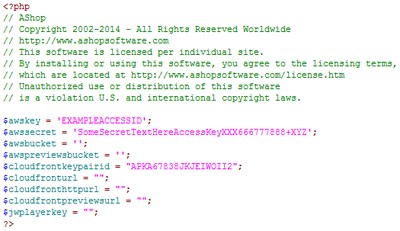
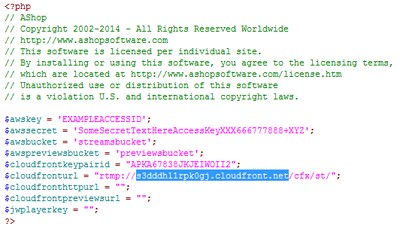
Click Download Private Key File and take note of where you store the downloaded file. Use an ftp software to upload the file to your AShop into the folder: includes/aws. Go back to the browser where your AWS Security Credentials page is open and copy the text in the Access Key ID column for the CloudFront Key Pair you just created. Paste this text into your aws-config.php file on the line that starts with $cloudfrontkeypairid. Your aws-config.php file should now look something like this:
Next you will need to create one or two S3 storage buckets, which will hold the video files you sell access to. One bucket will be used for the actual sold video clips and a second bucket can optionally be created to hold previews that are shown directly in the shopping cart, if you want to give your customers a taste of what they are buying. The S3 buckets are created from the S3 Management Console, which you access by clicking Services in the upper left corner of the AWS console and then S3 in the drop down menu.
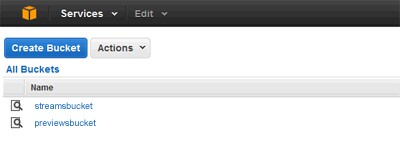
Click Create Bucket to bring up the following popup window:
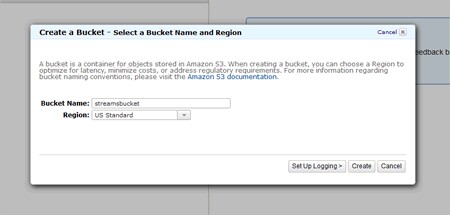
Enter a name for your bucket in the Bucket Name box and select where the bucket should be stored in the Region box. The location of the bucket should be set to a place as close to your customers' location as possible. If you are selling mainly to European customers, select Ireland, if you are selling mainly to US customers, select US Standard. This will minimize any latency and keep things running as smoothly as possible for everyone.
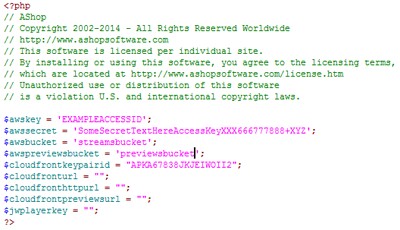
Repeat this step to create a second bucket for your preview clips, if wanted. Enter the name of your main bucket in the aws-config.php file on the line that starts with $awsbucket and the preview bucket on the line that starts with $awspreviewsbucket. Your aws-config.php file should now look similar to this:
Now that we have a place to store the video clips on AWS, we just need to setup the CloudFront content delivery service to stream those clips from the S3 buckets we just created. To do so, select CloudFront on the Services menu in the top left corner of the AWS console page.

Click Create Distribution to start setting up your first CloudFront distribution. This should be of type RTMP. Click the button Get Started in the RTMP area. This will bring up the following page, where you configure the new CloudFront distribution:
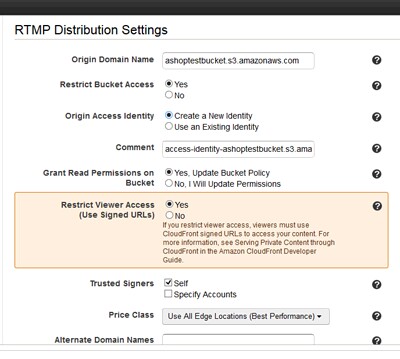
Click the Origin Domain Name to see a list of domain names for the S3 buckets you previously created. Each domain name starts with the name of the bucket in S3. Select the one you created to store the video streams you are going to sell.
Set the option Restrict Bucket Access to Yes, which will make sure no one can access the S3 bucket directly. It must go through CloudFront.
Set the option Origin Access Identity to Create a New Identity, unless you have already setup a CloudFront distribution before, in which case you select Use an Existing Identity and then choose the identity in the box Your Identities.
Set Grant Read Permissions on Bucket to Yes, Update Bucket Policy, which will update your S3 bucket to grant access to it through CloudFront. This can be done manually as well through the S3 console, but it's quite complicated and this automatic option is a much better choice in most cases.
Set Restrict Viewer Access to Yes. This step is very important. Without it, anyone will be able to access your video streams for free if they just know the URL to them, but with viewer access restricted, your customers will only be able to view the streams through the delivery area of your AShop.
Leave the rest of the options unchanged, unless you want to optimize your performance or cost by changing the Price Class option to something that suits your needs.
Click Create Distribution to have AWS start the process of adding the distribution according to your settings. Note that this can take a while, up to a few hours. To check the state of your request, click "Distribution" in the left menu to bring up a list of CloudFront distributions you have created. The one you just requested will have a status of "InProgress" until it is ready, which will change it to "Deployed".
Once the distribution is deployed, click its information, "i", icon to view the details of your distribution. On this page, you will find the domain name through which the distribution can be accessed in the row labeled Domain Name. Select and then copy the domain name and paste it into your aws-config.inc file.
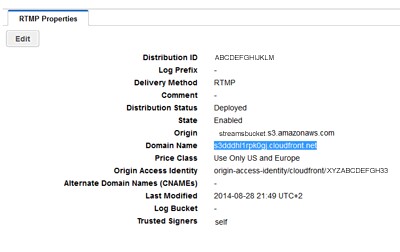
The domain name to your CloudFront distribution should go on the line that starts with $cloudfronturl. Prepend this text to the domain name: "rtmp://"
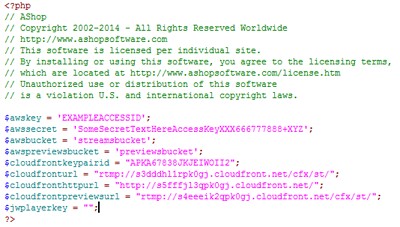
and add "/cfx/st/" to the end of it. The aws-config.inc file should now look like this:
If you want to use CloudFront to show preview clips of your streams directly in the product catalog, repeat the above steps but select the S3 bucket you created for previews instead, then copy and paste the domain into the row that starts with $cloudfronpreviewsurl, again prepending it with "rtmp://" and appending "/cfx/st/".
Since iOS devices (iPhone, iPad, iPod) do not support the RTMP streaming protocol, you will need to create one more CloudFront distribution to make those work. This one is setup exactly the same way as the RTMP distributions, but you select Web instead at the first step. Enter the resulting domain name into the line that starts with $cloudfronturl in your aws-config.php file, but this time prepend "http://" instead and just add a slash "/" to the end of it.
Now your aws-config.php file should look something like this:
Now we are only missing one more piece of information to make the configuration file complete. Check the next topic about setting up JWPlayer to find out how to do this. You will not need to configure anything more in your AWS account, so you can log out of it at this point.